Are your beloved headphones feeling less like a comforting embrace and more like a prickly nuisance? That cracked, peeling, or flattened ear pad isn’t just an aesthetic issue; it’s silently degrading your listening experience and hygiene. Instead of relegating your trusty pair to the tech graveyard, a simple and cost-effective solution awaits: replacing those worn-out ear pads. This guide will walk you through everything you need to know, transforming your headphones back into the comfortable, high-performing audio companions they were meant to be.
Why Replacing Your Headphone Ear Pads Matters
Many users overlook the crucial role ear pads play in their listening experience and overall headphone longevity. These seemingly small components are vital for both comfort and sound quality, acting as a crucial barrier between your ears and the headphone drivers.
Restore Comfort and Hygiene
|
Our Picks for the Best headphone in 2026
As an Amazon Associate I earn from qualifying purchases.
|
||
| Num | Product | Action |
|---|---|---|
| 1 | Sony WH-CH520 Wireless Headphones Bluetooth On-Ear Headset with Microphone and up to 50 Hours Battery Life with Quick Charging, Blue |

|
| 2 | Sony WH-CH520 Wireless Headphones Bluetooth On-Ear Headset with Microphone and up to 50 Hours Battery Life with Quick Charging, Black |
|
| 3 | Soundcore by Anker Q20i Hybrid Active Noise Cancelling Headphones, Wireless Over-Ear Bluetooth, 40H Long ANC Playtime, Hi-Res Audio, Big Bass, Customize via an App, Transparency Mode (White) |
|
| 4 | TAGRY Hybrid Active Noise Cancelling Bluetooth Headphones 100H Playtime Wireless Over Ear Headphone with Fast Charging Hi-Res Audio Headsets Comfort Earcups for Commute Travel Office Phone PC Black |
|
| 5 | Sony WH-CH720N Noise Canceling Wireless Headphones Bluetooth Over The Ear Headset with Microphone and Alexa Built-in, Black New |
|
| 6 | Soundcore by Anker Q20i Hybrid Active Noise Cancelling Headphones, Wireless Over-Ear Bluetooth, 40H Long ANC Playtime, Hi-Res Audio, Big Bass, Customize via an App, Transparency Mode |
|
| 7 | Logitech H390 Wired Headphones with Mic, USB-A Headset with Microphone for PC, Noise Cancelling Microphone for Video Meetings, Music, Gaming - Black |
|
| 8 | Hybrid Active Noise Cancelling Bluetooth 6.0 Headphones 120H Playtime 6 ENC Clear Call Mic, Over Ear Headphones Wireless with Hi-Res Audio Comfort Earcup Low Latency ANC Headphone for Travel Workout |
|
| 9 | JBL Tune 770NC - Adaptive Noise Cancelling with Smart Ambient Wireless Over-Ear Headphones, Bluetooth 5.3, Up to 70H Battery Life with Speed Charge, Lightweight, Comfortable & Foldable Design (Black) |
|
| 10 | BERIBES Bluetooth Headphones Over Ear, 65H Playtime and 6 EQ Music Modes Wireless Headphones with Microphone, HiFi Stereo Foldable Lightweight Headset, Deep Bass for Home Office Cellphone PC Ect. |
|
Over time, ear pads inevitably succumb to wear and tear. The soft cushioning flattens, materials crack, and they can absorb sweat, skin oils, and dirt. This degradation leads to discomfort during extended listening sessions, making your headphones irritable to wear. Beyond comfort, old ear pads can become a breeding ground for bacteria, leading to unpleasant odors and potential skin irritation. Replacing them is a straightforward way to refresh your headphones, ensuring a clean and plush feel every time you put them on.
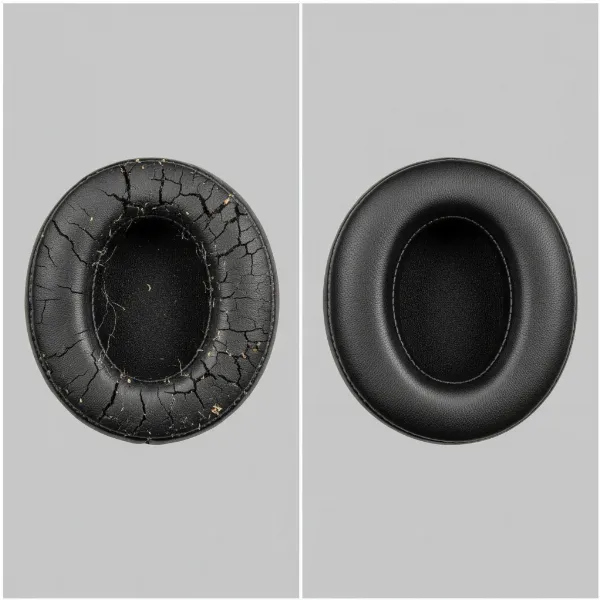 Compare old worn-out headphone ear pads with new, plush, clean replacement ear pads.
Improve Sound Quality and Noise Isolation
Worn-out ear pads can significantly compromise your headphones’ acoustic performance. When ear pads lose their shape or seal, they create gaps that allow sound to leak out and ambient noise to seep in. This diminishes bass response, reduces clarity, and impairs the effectiveness of noise cancellation. Fresh ear pads restore the optimal seal around your ears, preserving the intended sound signature, enhancing bass, improving detail, and maximizing passive (and active) noise isolation.
Extend the Lifespan of Your Headphones
Replacing ear pads is a simple act of maintenance that can dramatically extend the life of your entire headphone unit. It prevents premature disposal of otherwise perfectly functional headphones due to a single worn component. Investing in new ear pads is far more economical and environmentally friendly than purchasing a brand-new pair.
When to Replace Your Headphone Ear Pads
Knowing when to swap out your ear pads is key to maintaining a premium listening experience. Pay attention to these common indicators that it’s time for a replacement:
- Rough Feel and Cracking: If the material on your ear pads feels rough, brittle, or shows visible cracks and peeling, it’s a clear sign of deterioration.
- Unpleasant Odor: Over time, sweat, oils, and dirt can accumulate and saturate the porous materials, leading to persistent odors that no amount of cleaning can remove.
- Loss of Cushioning: If your ear pads feel flattened, compressed, or no longer provide the soft, springy bounce they once did, they’ve lost their ergonomic support.
- Audible Sound Leakage: A compromised seal due to worn pads will result in less bass, reduced clarity, and more outside noise bleeding into your audio.
- Irritation and Discomfort: If your ears or head start to hurt after short listening sessions, especially if you wear glasses, the ear pads might be too firm or not providing adequate cushioning.
Essential Tools for Ear Pad Replacement
Before you begin, gather these simple tools to ensure a smooth replacement process:
- Replacement Ear Pads: Ensure these are specific to your headphone model for a perfect fit.
- Plastic Prying Tool: Essential for glued ear pads. An old credit card, a guitar pick, or a dull butter knife can also work.
- Old Toothbrush or Small Brush: For cleaning off debris and adhesive residue.
- Rubbing Alcohol and Cotton Swabs/Soft Cloth: To meticulously clean the headphone surface after removing old pads.
- Earpad Adhesive Tape (if needed): Some replacement pads may come with pre-applied adhesive; otherwise, you might need to purchase it separately for glued models.
Step-by-Step Guide: How to Replace Your Headphone Ear Pads
The process of replacing ear pads varies slightly depending on how they are attached. Most headphones use either a stretch-fit mechanism or adhesive.
Method 1: For Easily Removable (Stretch-Fit) Ear Pads
This is the most common and simplest method, typically found on many over-ear and on-ear headphones.
- Remove the Old Pads: Gently grasp the outer edge of the ear pad and pull it away from the headphone cup. You should feel a fabric lip or ring around the back of the pad that is tucked into a groove or over a flange on the headphone. Carefully work your way around the entire circumference, pulling the lip out of the groove until the old pad comes off completely.
- Clean the Headphone Surface: Once the old pad is removed, use a soft cloth or cotton swab dampened with rubbing alcohol to clean any dust, skin oils, or minor debris from the ear cup and the groove where the new pad will sit. Allow it to dry completely.
- Install the New Pads: Take a new ear pad and align a small section of its fabric lip with the groove or flange on the headphone cup. Gently press this section into place. Then, using your fingers, slowly work your way around the entire edge, carefully stretching the fabric lip and tucking it into the groove. Take your time to ensure the pad sits snugly and evenly, without any creases or gaps. Avoid pressing directly on the thin inner speaker mesh, as this can damage it.
Method 2: For Glued/Adhesive-Backed Ear Pads
Some headphone models, notably certain Beats headphones, use factory adhesive to secure the ear pads. This method requires a bit more care.
- Gently Pry Off Old Pads: Using a plastic prying tool, carefully insert it between the ear pad and the speaker housing. Slowly and gently pry away a small section of the pad. Work your way around the entire pad, applying consistent, gentle pressure until the adhesive separates and the pad comes off. Be patient to avoid damaging the headphone housing.
- Remove Adhesive Residue: This is a crucial step. Use an old toothbrush or a small brush to scrub away any loose dirt or remaining adhesive from the headphone driver and housing. Follow up with a cotton swab or soft cloth dampened with rubbing alcohol to thoroughly clean the surface, removing all traces of old glue. A clean surface is essential for the new adhesive to bond properly. Let the surface dry completely before proceeding.
- Apply New Adhesive (if necessary): If your replacement pads do not come with pre-applied adhesive, carefully apply the earpad tape to the back of the new pads, ensuring the holes align perfectly.
- Install the New Pads: Remove the paper backing from the adhesive tape on the new ear pads. Carefully align the new pad with the headphone cup, paying attention to any specific orientation (e.g., a seam facing downwards towards a port). Once aligned, firmly press the new pad onto the headphone cup, applying even pressure around all edges for at least 10-15 seconds to ensure a secure bond. Make sure there are no gaps that could affect sound isolation.
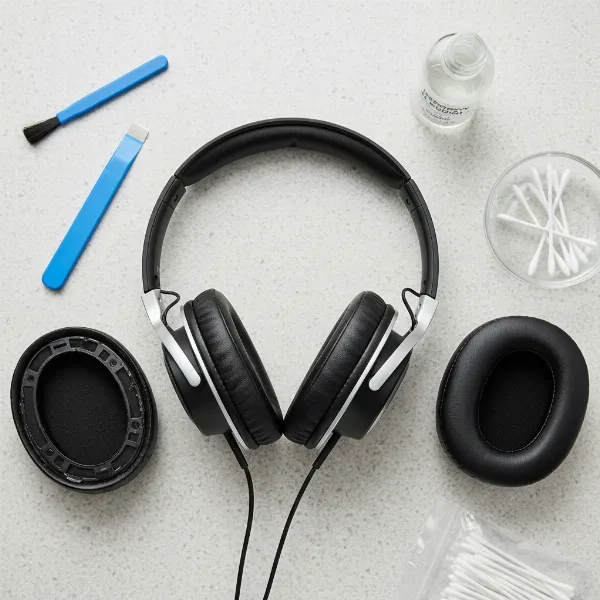 Essential tools and step-by-step process for installing new headphone ear pads.
Buying Guide: Choosing the Right Replacement Ear Pads
Selecting the perfect replacement ear pads is crucial for both comfort and performance. Here’s what to consider:
Compatibility is Key
The most critical factor is ensuring compatibility with your specific headphone model. Many headphones have unique ear pad shapes and attachment mechanisms. Always check if the replacement pads are designed for your exact brand and model. Some manufacturers offer official replacements, while many reputable third-party brands provide high-quality alternatives.
Material Matters: Comfort, Sound, and Durability
Different materials offer varying comfort levels, durability, and even subtly influence sound characteristics.
| Material | Features | Pros | Cons |
|---|---|---|---|
| Velour/Microfiber | Soft, breathable fabric; often uses memory foam underneath. | Excellent comfort, good for long sessions, less heat buildup. | Can absorb sweat/oils, may slightly reduce bass, requires more cleaning. |
| Protein Leather | Synthetic leather, smooth feel, often with memory foam. | Good comfort, durable, easy to clean, good bass retention. | Less breathable than velour, can get sticky with heavy use. |
| Genuine Leather | Premium feel, natural material, usually with memory foam. | Very durable, excellent sound isolation, often enhances bass. | Can be expensive, less breathable, may require conditioning. |
| Hybrid | Combines multiple materials (e.g., velour surface, leather sidewalls). | Balances comfort, sound, and durability; custom sonic profiles. | Varies greatly by specific hybrid design. |
“The material of your ear pads isn’t just about how comfortable they feel; it fundamentally shapes the acoustic interaction between the driver and your ear, directly impacting bass, soundstage, and overall clarity.” – Dr. Anya Sharma, Audio Acoustics Engineer
Consider Density and Style
Density, particularly for foam pads, can influence how much sound escapes or resonates, thus affecting the sonic signature. Denser foam tends to hold in bass and treble tones longer, while thinner pads might lead to a brighter sound. Style is also a factor, as replacement pads come in various colors and designs, allowing you to personalize your headphones.
Where to Purchase
- Manufacturer’s Website: Best for guaranteed compatibility and original quality.
- Reputable Online Retailers: Amazon, eBay, and specialized audio stores offer a wide selection of third-party replacements. Read reviews carefully.
- Specialized Earpad Brands: Companies like Brainwavz, Dekoni Audio, and WC Upgraded specialize in high-quality aftermarket ear pads, often offering material upgrades.
Expectations After Replacing Ear Pads
After installing new ear pads, you can look forward to several improvements:
- Enhanced Comfort: Expect a noticeable difference in how your headphones feel, especially if you opted for a material upgrade like memory foam or softer velour.
- Improved Sound Quality: Many users report a restoration of bass response, clearer mids and highs, and better overall audio immersion due to the renewed seal.
- Better Noise Isolation: The tighter fit will reduce ambient noise, allowing you to focus more on your audio.
Keep in mind that changing the material of your ear pads from the original can subtly alter the sound profile of your headphones. For example, switching from pleather to velour might slightly reduce bass but improve breathability.
Tips for Maintaining Your Headphone Ear Pads
To maximize the lifespan of your new ear pads and keep your headphones in top condition, follow these maintenance tips:
- Clean Regularly: Wipe your ear pads after every use with a soft, dry cloth to remove sweat and oils. For deeper cleaning, gently wipe with a cloth dampened with mild soap and water weekly, allowing them to air dry completely.
- Use Leather Conditioner: If you have genuine or protein leather pads, apply a small amount of leather conditioner once or twice a year to prevent drying and cracking.
- Store Properly: When not in use, store your headphones in a protective case or on a stand to protect them from dust, direct sunlight, and physical damage. This also prevents unnecessary compression of the pads.
- Utilize Silica Gel Packets: Place a small silica gel packet in your headphone case to absorb moisture, which can accelerate material degradation and odor development.
- Practice Good Hygiene: Keeping your ears clean reduces the transfer of earwax and skin oils to the ear pads, extending their freshness.
Conclusion
Replacing worn-out headphone ear pads is a simple yet impactful way to rejuvenate your listening experience. It’s a testament to the fact that you don’t always need to buy new when a small repair can make a world of difference. By following these steps and choosing the right replacement pads, you can restore optimal comfort, enhance sound quality, and prolong the life of your cherished headphones. So, don’t let discomfort or degraded sound spoil your audio journey any longer.
Ready to give your headphones a fresh start and rediscover the joy of pristine audio?
Frequently Asked Questions
Is it hard to replace headphone ear pads?
For most headphones, replacing ear pads is a straightforward process that takes only a few minutes and requires minimal tools. While some models with adhesive-backed pads may need a bit more care during removal and cleaning, the overall task is generally easy enough for anyone to tackle.
How often should I replace my headphone ear pads?
The frequency depends on usage, material, and personal hygiene, but generally, ear pads should be replaced every 6 to 18 months. Heavy users, especially those who exercise with headphones, might need to replace them sooner if they notice cracking, flattening, or unpleasant odors.
Can replacing ear pads affect sound quality?
Yes, absolutely. Ear pads play a critical role in acoustic sealing and the distance between the drivers and your ears. Different materials and densities can alter bass response, treble clarity, and soundstage. Choosing a material similar to the original or researching aftermarket options specific to your sound preferences is recommended.
Where can I buy replacement ear pads?
You can find replacement ear pads from the headphone manufacturer’s official website, major online retailers like Amazon, or specialized audio accessory stores. Brands like Brainwavz and Dekoni Audio also offer high-quality universal or model-specific aftermarket options.