Have you ever listened to your favorite music through your headphones and felt like something was missing? Perhaps the bass wasn’t punchy enough, vocals sounded muffled, or the treble was too harsh. You’re not alone. Many headphones, even premium ones, don’t perfectly match everyone’s listening preferences or ideal sound targets. This is where an equalizer, or EQ, becomes your secret weapon. With the right EQ adjustments, you can transform your listening experience, tailoring the sound precisely to your ears and bringing your music to life.
This comprehensive guide will demystify headphone equalization, explaining what an EQ is, why it’s so valuable, and how to use it effectively. We’ll explore the different frequency ranges, walk you through practical tuning methods, and provide expert tips to help you achieve a truly personalized and immersive audio journey.
Understanding Equalization: Your Personal Audio Architect
At its core, an equalizer (EQ) is an audio tool that allows you to adjust the volume levels of specific frequency ranges within a sound signal. Think of it as a set of “frequency-specific volume knobs” that empower you to fine-tune the sonic balance of your headphones.
Why bother with EQ? There are several compelling reasons. Firstly, personal preference plays a huge role; what sounds “good” is subjective. EQ lets you sculpt the sound to match your unique taste, whether you crave more bass, clearer vocals, or sparkling highs. Secondly, headphones often have inherent sonic flaws – perhaps a dip in the mid-range or an overly bright treble – that an EQ can expertly correct, bringing them closer to a desired, neutral sound. Finally, some audiophiles aim to match their headphones to a recognized target curve, like the Harman Target Response Curve, for a consistent and accurate listening experience.
When it comes to EQs, you’ll primarily encounter two types:
- Graphic EQs offer a set number of fixed frequency bands with adjustable gain sliders. They are simpler to use but less precise.
- Parametric EQs, preferred by professionals, provide much more control, allowing you to select the exact frequency, adjust its gain (boost or cut), and define the “Q-factor” or bandwidth (how wide or narrow the affected frequency range is). For surgical sound corrections, a parametric EQ is invaluable.
Decoding the Frequency Spectrum: What Each Band Does
To effectively EQ your headphones, it’s essential to understand the different frequency ranges and how adjusting them impacts the sound. Here’s a simplified breakdown:
- Sub-Bass (20Hz-60Hz): This is the realm of deep, visceral rumble and impact. Boosting here adds a powerful foundation, ideal for genres like hip-hop and electronic music. Too much, however, can lead to a boomy, overwhelming sound. Frequencies below 30Hz are often more felt than heard.
- Bass (60Hz-250Hz): This range adds warmth and punch to instruments like kick drums, bass guitars, and some orchestral elements. While 60-200Hz can add fullness, an excess in the 125-250Hz range can cause muddiness, making the bass sound thick and indistinct, potentially bleeding into the midrange.
- Low-Mids (250Hz-600Hz): This section gives body and fullness to drums, guitars, and male vocals. It’s also where sound can become muddy or “boxy” if overemphasized. A slight reduction here (around 250-500Hz) can often improve clarity and separation.
- Mids (600Hz-2kHz): This is the heart of most music, where vocals, guitars, and many other primary instruments reside. Adjustments here directly impact clarity, definition, and vocal presence. Too little can make music sound hollow, while too much can create a “honky” or “nasal” quality.
- Upper Mids (2kHz-4kHz): This range is crucial for the presence and attack of instruments and can add “bite” to vocals. However, it’s also a common area for harshness or “shoutiness.” Headphones may exhibit dips here (around 2-3kHz) or aggressive peaks.
- Treble (4kHz-8kHz): This range adds sparkle, detail, and air to recordings. It’s where cymbal crashes shimmer and female vocals shine. Careful adjustment is key; too much can lead to sibilance (harsh “s” and “sh” sounds) or an overly bright, fatiguing sound.
- Air (8kHz-20kHz): These very high frequencies contribute to the sense of openness, spaciousness, and realism. Over-boosting can create an artificial sense of detail, while a natural roll-off above 10kHz is common, especially as we age.
 Visual representation of audio frequency spectrum with labeled bands and an equalizer interface.
|
Our Picks for the Best headphone in 2026
As an Amazon Associate I earn from qualifying purchases.
|
||
| Num | Product | Action |
|---|---|---|
| 1 | Hybrid Active Noise Cancelling Bluetooth 6.0 Headphones 120H Playtime 6 ENC Clear Call Mic, Over Ear Headphones Wireless with Hi-Res Audio Comfort Earcup Low Latency ANC Headphone for Travel Workout |

|
| 2 | BERIBES Bluetooth Headphones Over Ear, 65H Playtime and 6 EQ Music Modes Wireless Headphones with Microphone, HiFi Stereo Foldable Lightweight Headset, Deep Bass for Home Office Cellphone PC Ect. |
|
| 3 | JBL Tune 770NC - Adaptive Noise Cancelling with Smart Ambient Wireless Over-Ear Headphones, Bluetooth 5.3, Up to 70H Battery Life with Speed Charge, Lightweight, Comfortable & Foldable Design (Black) |
|
| 4 | Soundcore by Anker Q20i Hybrid Active Noise Cancelling Headphones, Wireless Over-Ear Bluetooth, 40H Long ANC Playtime, Hi-Res Audio, Big Bass, Customize via an App, Transparency Mode (White) |
|
| 5 | Sony WH-CH520 Wireless Headphones Bluetooth On-Ear Headset with Microphone and up to 50 Hours Battery Life with Quick Charging, Blue |
|
| 6 | Sony WH-CH720N Noise Canceling Wireless Headphones Bluetooth Over The Ear Headset with Microphone and Alexa Built-in, Black New |
|
| 7 | Sony WH-CH520 Wireless Headphones Bluetooth On-Ear Headset with Microphone and up to 50 Hours Battery Life with Quick Charging, Black |
|
| 8 | TAGRY Hybrid Active Noise Cancelling Bluetooth Headphones 100H Playtime Wireless Over Ear Headphone with Fast Charging Hi-Res Audio Headsets Comfort Earcups for Commute Travel Office Phone PC Black |
|
| 9 | Soundcore by Anker Q20i Hybrid Active Noise Cancelling Headphones, Wireless Over-Ear Bluetooth, 40H Long ANC Playtime, Hi-Res Audio, Big Bass, Customize via an App, Transparency Mode |
|
| 10 | Logitech H390 Wired Headphones with Mic, USB-A Headset with Microphone for PC, Noise Cancelling Microphone for Video Meetings, Music, Gaming - Black |
|
Mastering the Art of Headphone EQ: Two Approaches
There are two primary ways to approach EQing your headphones: relying on your ears, or using objective measurements. Often, the best results come from combining both methods.
1. Tuning by Ear: The Intuitive Listener’s Guide
This approach involves adjusting EQ settings based purely on what sounds good to you. It’s highly personal and accessible, requiring no special equipment beyond your headphones and an EQ application.
How it works:
The process is iterative: you make a small adjustment, listen to how it changes the sound, and then decide if it moves you closer to your desired outcome. Patience and critical listening are your best tools.
Process for Tuning by Ear:
- Choose Familiar Tracks: Start with high-quality recordings of music you know intimately. This helps you identify deviations from what you expect. Use tracks with a good mix of vocals and instruments to cover different frequency ranges effectively.
- Make Small, Incremental Changes: Begin with very subtle adjustments, perhaps ±1 to 3 dB at a time. Drastic changes can quickly distort the sound or make it difficult to pinpoint the effect of each band.
- Exaggerate and Dial Back: A common technique is to boost or cut a specific frequency band excessively to clearly hear its impact, then gradually dial it back to a natural, more subtle level.
- Focus on Specific Issues: If bass sounds muddy, try reducing the low-mid frequencies. If vocals are recessed, try boosting the mid-range. If treble is harsh, try a gentle cut in the upper treble.
- Use the Bypass Feature: Most EQ applications include a “bypass” button. Toggle it on and off to quickly compare your EQed sound with the original. Remember to let your brain adapt for at least 30 seconds after each switch to accurately perceive the differences.
“It’s often more effective to reduce unnecessary frequencies than to over-boost others. Even small changes can make a noticeable difference.” – Shimo Jiroaki, Product Marketing Lead for Personal Entertainment, Sony Electronics.
2. Tuning by Measurements: The Scientific Method
This approach relies on objective data rather than subjective listening. It’s particularly useful for achieving a scientifically “neutral” or “accurate” sound profile.
How it works:
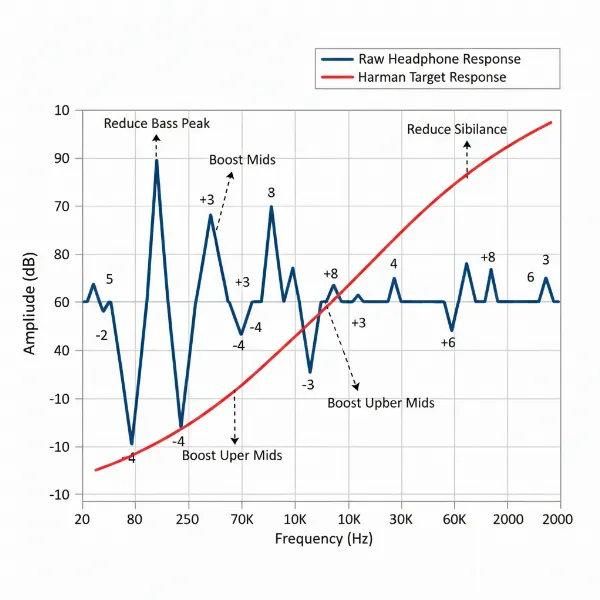
You start by analyzing your headphone’s inherent sound signature using frequency response graphs. These graphs show how loud different frequencies are reproduced by your headphones. You then compare this to a scientifically derived “target curve,” such as the Harman Target Response Curve.
Key Concept: The Harman Target Response Curve
The Harman Curve is an industry-recognized target that represents the sound signature most listeners prefer for headphones. It aims to replicate the experience of listening to well-placed, neutral speakers in an ideal room. Headphones EQed to the Harman Curve often sound balanced, natural, and highly detailed.
 Graph comparing headphone frequency response curve to the Harman Target Response for accurate sound.
Process for Tuning by Measurements:
- Obtain Frequency Response Measurements: Websites like RTINGS.com or Crinacle provide detailed frequency response graphs for many popular headphones.
- Identify Deviations: Compare your headphone’s graph to the Harman Target Response Curve (or similar). Note areas where your headphones have peaks (too loud) or dips (too quiet).
- Apply EQ Corrections: Using a parametric EQ, apply inverse corrections to flatten out peaks and fill in dips, bringing your headphone’s response closer to the target curve. Online tools like AutoEQ can even generate these filter sets for you.
- Verify with Listening Tests and Test Tones: Even with precise measurements, individual ear anatomy can influence perception. Use test tones (log sweeps, sinewaves) and familiar music to fine-tune the measured EQ settings by ear for your personal physiological biases.
Your Step-by-Step Guide to EQing Headphones
Ready to take control of your headphone’s sound? Here’s how to get started:
Step 1: Choose Your EQ Software or Hardware
The method for EQing varies depending on your headphones and playback device.
- Wireless Headphone Companion Apps: Many wireless headphones (e.g., Sony, Bose, Sennheiser) come with dedicated mobile apps that include built-in EQ features. These typically offer graphic EQs or pre-programmed presets, and some even feature auto-generated EQs based on listening tests.
- Music Streaming Service EQs: Popular services like Spotify and Apple Music often have basic graphic EQs built into their mobile apps. These are convenient but generally less precise.
- Dedicated Third-Party Software (Recommended for Wired & Advanced Users):
- Desktop (Windows): Equalizer APO is a powerful, free, system-wide parametric EQ. Combine it with a graphical user interface like Peace GUI for ease of use. For audio players, J River Media Center offers excellent DSP plugin management and can host VST EQs like the free EasyQ.
- Desktop (Mac): Options like Boom 3D or SoundSource provide system-wide EQ capabilities. Many professional VST plugins are also Mac compatible.
- Mobile (Android): Apps like Neutron Player and Poweramp offer advanced parametric EQs integrated into their music players.
- Mobile (iOS): System-wide EQ is more restricted on iOS. You’ll need music player apps with built-in EQs or dedicated audio utility apps.
Step 2: Identify Problem Areas in Your Sound
Before you start tweaking, take the time to critically listen and identify what you want to change.
- Critical Listening with Music: Play your favorite, high-quality tracks. Pay attention to different aspects: Is the bass too strong or weak? Do vocals sound clear or recessed? Is the treble harsh, dull, or sibilant? Make mental notes or even jot them down. Remember to test tracks that intentionally reveal flaws, like overly bright masters for sibilance.
- Using Test Tones (for precision):
- Logarithmic Sweeps (20Hz-20kHz): A log sweep plays a sine wave that gradually moves through the entire frequency spectrum. This is a quick and reliable way to audibly pinpoint dips and peaks in your headphone’s response. A perfectly neutral headphone will sound smooth during the sweep. You can find these on YouTube or download pre-rendered files.
- Pre-rendered Sinewave Test Tones: These are individual sine wave tones at specific frequencies (e.g., 50Hz, 100Hz, 1kHz, 5kHz). You can use these to precisely evaluate the amplitude at particular points.
- Audio Spectrum Analyzers: These tools (often built into media players or available as plugins) provide a real-time visual representation of the frequency content of your audio. They can help you visually confirm the frequencies you’re hearing (or not hearing) during test tone playback.
Step 3: Apply EQ Adjustments Effectively
This is where you put your understanding into practice.
- The Golden Rule: Cut First, Then Boost (Sparingly): This is perhaps the most crucial tip from audio professionals. Instead of aggressively boosting desired frequencies, which can introduce distortion and overwork your headphone drivers, focus on cutting problematic or overly prominent frequencies. Once you’ve made cuts, you can then increase the overall volume (pre-gain) to restore perceived loudness. This approach maintains clarity and reduces the risk of distortion.
- Focus on Small Changes: Always start with subtle adjustments, typically within ±1-3 dB. Large shifts can drastically alter the sound and make it harder to find the sweet spot.
- Understanding Q-Factor (Bandwidth):
- Narrow Q: Use a narrow Q-factor (higher numerical value) when you need to make very precise, “surgical” corrections, such as taming a specific harsh peak in the treble.
- Wide Q: Use a wider Q-factor (lower numerical value) for broader tonal adjustments, like giving the entire bass region a gentle lift or cut.
- Addressing Common Sound Issues with Specific Frequencies:
- Bloated or Muddy Bass: Gently reduce frequencies in the 125Hz-250Hz range. If you want more impact, a subtle boost in the 32Hz-64Hz range can add punch without overwhelming the mids.
- Recessed or Unclear Vocals/Mids: Consider a subtle boost in the 500Hz-2kHz range. Sometimes, reducing distracting frequencies in the very low bass (32-135Hz) and very high treble (8kHz-16kHz) can bring vocals forward by creating space.
- Harsh Treble or Sibilance: Apply gentle cuts in the 4kHz-8kHz region. If you notice an artificial “detail” that sounds unnatural, try reducing frequencies around 10kHz-12kHz.
Maximizing Your EQ Potential: Advanced Tips
- Pre-gain / Headroom: Whenever you plan to boost frequencies, it’s a good practice to slightly lower the overall “pre-gain” or “volume” setting in your EQ software first. This creates headroom, preventing digital clipping and distortion when frequencies are increased.
- Don’t Over-EQ: The goal is improvement, not transformation. Subtle, targeted adjustments are almost always more effective than aggressive, wide-ranging changes. Aim for naturalness.
- Environmental Factors: If your headphones have noise cancellation, use it. This helps isolate the headphone’s sound from external interference, making your EQ adjustments more accurate to the headphone’s true output.
Choosing Headphones with EQ in Mind
While EQ can improve nearly any headphone, some are better suited for it than others. If you’re buying new headphones with the intention of EQing them, consider these points:
- Start with a Good Foundation: Headphones with a relatively neutral, balanced, or “flat” frequency response make the best starting point. They require fewer drastic corrections, leading to more natural and transparent results.
- Technical Performance Matters: EQ can fine-tune tonal balance, but it cannot fundamentally change a headphone’s underlying technical capabilities like soundstage, imaging, or detail retrieval. Choose headphones that already excel in these areas.
- Software/App Support: For wireless models, check if the companion app offers a robust EQ. For wired headphones, verify they are compatible with popular third-party desktop or mobile EQ solutions.
Conclusion
Equalization is a powerful tool that puts you in control of your headphone’s sound. By understanding the frequency spectrum and applying thoughtful adjustments, you can move beyond a generic sound signature to a truly personalized and immersive listening experience. Whether you tune by ear, leveraging your own preferences, or by measurements, aiming for a scientifically neutral target like the Harman Curve, the key is patience, critical listening, and the golden rule: cut problematic frequencies first before boosting. Experiment with small changes, use test tones, and don’t be afraid to try different settings. The journey to unlocking your audio’s full potential is an exciting one, promising a richer, clearer, and more enjoyable connection to your music.
What’s your favorite track to test your EQ settings?
Frequently Asked Questions
Is EQing bad for your headphones?
No, EQing itself is not inherently bad for your headphones. The potential for harm arises from extreme, uninformed boosting of frequencies, especially without proper pre-gain management. This can lead to distortion, clipping, or overworking the headphone drivers, which can reduce their lifespan or damage them. However, sensible and moderate EQ adjustments, particularly focusing on cuts, are perfectly safe and beneficial.
Can I EQ any headphones?
While you can technically apply EQ to almost any headphones, the effectiveness varies greatly. High-quality headphones with good inherent technical performance and a relatively neutral starting sound profile will generally respond better to EQ, allowing for more precise and impactful improvements. Very cheap or poorly designed headphones might not benefit as much, as EQ cannot fix fundamental driver limitations or poor build quality.
What is the Harman Curve?
The Harman Target Response Curve is a scientifically derived and widely accepted frequency response curve for headphones. It represents a preferred sound signature that aims to mimic the experience of listening to high-quality loudspeakers in a well-treated room. Many audiophiles and audio engineers use the Harman Curve as a reference point for achieving a neutral, natural, and enjoyable sound through EQ.
How often should I adjust my EQ settings?
Once you find an EQ setting you truly love for a particular pair of headphones and listening environment, you might not need to adjust it frequently. However, it’s common for enthusiasts to create different EQ profiles for various music genres, specific albums, different headphones, or even different listening situations (e.g., an EQ for casual listening vs. an EQ for critical analysis).
Why does my music sound distorted after EQing?
Distortion after EQing usually occurs due to digital clipping. When you boost certain frequency bands significantly, the audio signal’s volume can exceed the maximum digital level, leading to harsh, unpleasant distortion. To prevent this, it’s crucial to apply a pre-gain reduction (lowering the overall volume of the EQ output) before boosting any frequencies. This creates “headroom” for your boosts, allowing them to occur without clipping. Often, simply cutting problematic frequencies instead of boosting desired ones can also mitigate distortion.