There’s a unique frustration that comes with a broken headphone headband. One moment you’re immersed in your favorite audio, the next, your beloved headphones are unwearable, snapped or cracked. But before you relegate them to the tech graveyard, know that many common headband breaks can be fixed right at home. This guide will walk you through understanding common types of damage, gathering the right tools, and applying effective DIY repair techniques to bring your headphones back to life.
Understanding Common Headband Breaks
Headphone headbands are subjected to constant stress, leading to various forms of damage. Recognizing the type of break is the first step toward a successful repair.
The Vulnerability of Plastic Headbands
Plastic is a common material for headphone headbands due to its lightweight nature and affordability. However, it’s also the most prone to breaking. You’ll often find hairline cracks developing near the earcup hinges or adjustment sliders, areas that experience frequent bending and tension. In more severe cases, a plastic headband can completely snap, rendering the headphones unusable. These breaks usually occur from accidental drops, over-stretching, or material fatigue over time.
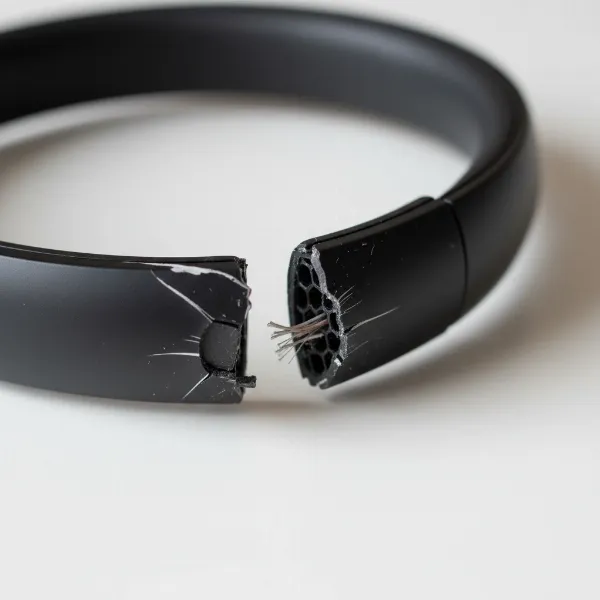 A close-up of a snapped plastic headphone headband with visible damage.
Metal Fatigue and Bending Issues
While generally more durable, metal headbands aren’t immune to damage. They can suffer from metal fatigue, leading to a gradual weakening that eventually causes a fracture. More commonly, metal headbands can bend or deform from impact or uneven pressure, affecting comfort and fit. Unlike plastic, metal often shows visible stress points before a complete break, offering a chance for preventative reinforcement.
Aesthetic Damage: Peeling Pads and Fabric Tears
Beyond structural integrity, the cosmetic components of a headband can also wear out. The padding, often made of pleather (synthetic leather) or fabric, can start to peel, crack, or tear. This not only looks unsightly but can also reduce comfort and hygiene. While not impacting functionality directly, restoring the aesthetic appeal contributes significantly to the overall headphone experience.
Essential Tools and Materials for Headband Repair
A successful repair hinges on having the right arsenal of tools and materials. Most items can be found at a local hardware store or craft shop.
Adhesives: Selecting the Right Glue for the Job
Choosing the correct adhesive is crucial for a lasting repair, especially for plastic components.
-
Super Glue (Cyanoacrylate) and Baking Soda: The Instant Cement Trick
For quick and remarkably strong repairs on plastic, a combination of liquid super glue and baking soda is highly effective. The baking soda acts as an accelerator, creating an instant, rigid cement-like bond that fills gaps and adds significant strength. Multiple layers can be applied, and the resulting material can be sanded smooth and even painted. This method is excellent for rejoining snapped plastic pieces. -
Two-Part Epoxy and Plastic Welders: For Maximum Strength
For breaks in high-stress areas or for plastics that are difficult to bond, a two-part epoxy or a specialized plastic welder adhesive (like Devcon or JB PlasticWeld) offers superior durability. These glues create a strong, permanent bond that can withstand significant force. Brands like Araldite are also renowned for their robust adhesive properties. While they require a longer curing time, their strength often justifies the wait.
Reinforcement Materials: Adding Durability to Your Repair
Glue alone may not always be sufficient. Reinforcement adds crucial structural integrity to prevent re-breakage.
-
Metal Strips (Spring Steel, Aluminum)
For severely broken plastic headbands, particularly those that have completely snapped, attaching thin strips of spring steel or aluminum can provide unparalleled strength. These strips can be drilled and bolted onto either side of the broken section, effectively creating a sturdy splint. -
Fiberglass Tape and Electrical Tape
Fiberglass tape, often used for drywall repair, can be wrapped around a glued break and saturated with super glue or epoxy to create a strong, rigid casing. For simpler reinforcement or to cover up repairs, several layers of durable electrical tape or duct tape can provide additional tensile strength and a neater finish. -
Headband Sleeves and Covers
These aren’t strictly repair materials for structural breaks but are excellent for covering cosmetic damage, adding comfort, or providing a thin layer of external reinforcement over a patched area. They can extend the life of a headband that is just starting to show wear on its padding.
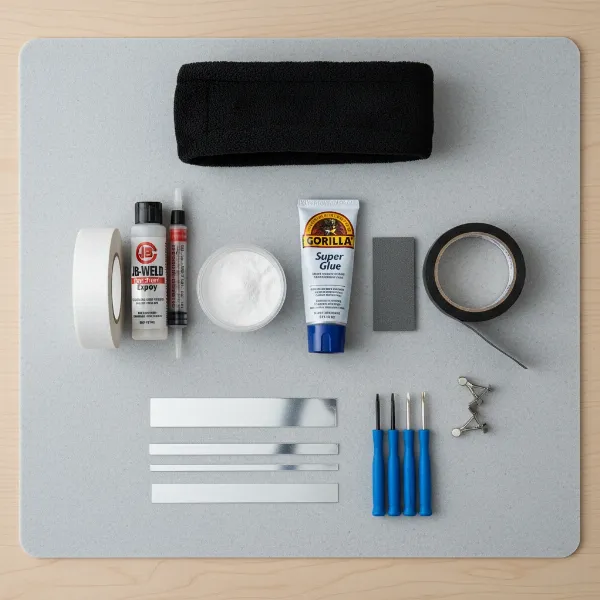 Assortment of tools and materials for DIY headphone headband repair.
Basic Tools You’ll Need
Beyond adhesives and reinforcement, a few common household tools will prove invaluable:
- Small screwdrivers (Phillips #0 is common for electronics)
- Sandpaper or a nail file (for smoothing rough edges or preparing surfaces for glue)
- Utility knife or sharp scissors (for trimming material or preparing padding)
- Small clamps or rubber bands (to hold parts together while glue dries)
- Toothpicks or cotton swabs (for precise glue application)
- Heat gun or hairdryer (useful if working with heat shrink tubing or curing certain epoxies)
Step-by-Step Repair Methods for Different Headband Materials
Each type of headband break calls for a specific approach. Patience and precision are key to a successful repair.
Repairing Broken Plastic Headbands
Plastic headbands are the most common culprits for breakage, but also highly repairable.
-
For Hairline Cracks: Clean, Glue, and Reinforce
Begin by cleaning the cracked area thoroughly to remove any dirt or oils. Use fine-grit sandpaper or a nail file to slightly rough up the surfaces around the crack. Apply a small amount of strong two-part epoxy or a super glue/baking soda mixture directly into the crack. For added strength, consider wrapping the area with a thin layer of fiberglass tape saturated with glue once the initial bond is dry. Clamp the area gently or hold it firm until the adhesive sets. -
For Complete Snaps: Align, Adhere, and Splint
When a plastic headband has completely snapped, precise alignment is critical. Carefully match the broken edges together. Apply a generous amount of two-part epoxy or the super glue/baking soda cement to both surfaces. Press the pieces firmly together, ensuring perfect alignment, and hold them with clamps or strong tape until fully cured. Once dry, reinforce the break externally. Drill small pilot holes on either side of the break on both segments. Then, use thin spring steel or aluminum strips on the top and bottom of the headband, bolting them securely through the drilled holes for maximum structural integrity. Alternatively, wrap the area tightly with several layers of fiberglass tape and epoxy or strong electrical tape.
Fixing Bent or Fractured Metal Headbands
Metal headbands require a different touch, focusing on careful manipulation and targeted reinforcement.
-
Straightening Techniques
For a bent metal headband, gentle, controlled pressure is essential. Use pliers with padded jaws or wrap the metal in a cloth to prevent scratching. Gradually bend the metal back into its original shape. Avoid sudden or excessive force, as this can cause a complete fracture. Work slowly, checking the symmetry and fit as you go. -
Reinforcing Metal Stress Points
If a metal headband shows signs of fatigue or a minor fracture, reinforcement can prevent further damage. Clean the area thoroughly. You can apply a strong metal-bonding epoxy to the weakened spot. For structural reinforcement, a custom-fitted metal sleeve or splint can be added. If a fracture is present, carefully align the pieces and secure them with a strong metal adhesive. For more complex metal breaks, professional welding might be the only truly permanent solution, though this is often not cost-effective for headphones.
Restoring Worn or Torn Padded Headbands
A worn-out headband pad can detract from comfort and appearance. These repairs are typically simpler and more cosmetic.
-
Re-gluing Peeling Material
If the pleather or fabric is merely peeling away from the headband core, a flexible fabric adhesive or contact cement can re-secure it. Apply a thin, even layer to both the peeling material and the headband, wait for the glue to become tacky (if specified by the adhesive), then carefully press them together. Use clamps or heavy books to apply even pressure while it dries. -
Covering Tears with Sleeves or Fabric
For significant tears, or when the original material is too far gone, a headband cover or sleeve is an excellent solution. These are readily available online in various materials and styles, or you can craft one yourself from durable fabric. Simply slide the cover over the existing headband, concealing any damage and providing a fresh, comfortable surface. This also offers a degree of protection against future wear.
Advanced Repair Options and Considerations
Sometimes, standard DIY fixes aren’t enough, and creative solutions or professional help may be needed.
3D Printing Custom Headband Parts
For those with access to 3D printing technology, designing and printing a custom replacement part for a broken plastic headband is an innovative and highly effective solution. This allows for a perfect fit and can even incorporate design improvements to prevent future breaks. CAD software can be used to model the exact dimensions, creating a durable and personalized repair.
When to Consider Professional Repair Services
While many repairs are manageable at home, there are times when professional intervention is the wisest choice. If the internal wiring is damaged, if critical components like adjustment mechanisms are broken beyond simple gluing, or if the headphones are a high-value item and you want to ensure a pristine repair, a specialist might be needed. Additionally, some manufacturers, like HyperX, indicate that specific headband parts are not available for replacement, making complex DIY or professional repair the only option.
Preventing Future Headband Damage
The best repair is often the one you don’t have to make. Adopting good habits can significantly extend the life of your headphone headband.
Best Practices for Handling and Storage
Avoid over-stretching your headphones when putting them on or taking them off. Instead of pulling one earcup out, gently expand the headband with both hands. When not in use, store your headphones on a dedicated stand or in a protective case. Never leave them dangling by a cable, as this puts undue stress on all components. Avoid tossing them into bags where they can be crushed or bent.
Choosing Headphones with Durable Headband Designs
When purchasing new headphones, consider durability as a key factor. Look for models with metal-reinforced headbands or those made from high-quality, flexible plastics. Some brands offer headbands with suede padding, which tends to be more resilient than pleather over time. Investing in headphones known for robust construction can save you the hassle of frequent repairs down the line.
The satisfaction of repairing your own headphones is immense. With the right tools, materials, and a bit of patience, you can often save money and extend the life of your favorite audio companion. Don’t let a broken headband be the end of your listening journey; embrace the DIY spirit and bring your headphones back to their former glory! What repair challenge will you tackle next?
Frequently Asked Questions
Is it possible to truly fix a snapped headphone headband?
Yes, absolutely! With the right adhesive, such as a strong two-part epoxy or a super glue and baking soda mixture, combined with reinforcement like metal splints or fiberglass tape, a snapped plastic headband can be restored to a functional and durable state. The key is proper alignment and strong external reinforcement.
What’s the strongest glue for headphone plastic?
For plastic headphone headbands, a two-part epoxy or a specialized “plastic welder” adhesive like Devcon or JB PlasticWeld generally offers the strongest, most durable bond. The super glue and baking soda trick is also remarkably effective for creating an instant, strong cement-like repair.
How can I reinforce my headphone headband after repair?
Reinforcement is crucial for lasting repairs. You can use thin strips of spring steel or aluminum bolted onto the break, wrap the area with fiberglass tape saturated in epoxy, or apply multiple layers of strong electrical tape. Headband sleeves or covers can also provide an additional protective layer and hide cosmetic imperfections.
When should I consider buying new headphones instead of repairing?
Consider buying new headphones if the damage is extensive, such as multiple breaks, severe internal wiring issues, or if the cost and effort of repair outweigh the value of the headphones. If replacement parts are impossible to find or if the structural integrity cannot be reliably restored, a new purchase might be more practical.
Can a broken metal headband be fixed at home?
Minor bends in metal headbands can often be gently straightened with pliers. For actual fractures, a strong metal-bonding epoxy can be used for small cracks, sometimes with a custom metal splint. However, for significant breaks requiring welding, professional repair is typically necessary and often a more durable solution than home DIY.